The art of creating tile mosaics reaches back through history. We started talking about tile history last month looking at Babylon and the longevity of their glazes. There are many ways of creating mosaics, in Babylon they made glazed bricks that fit together into compositions. The Islamic world continued this tradition and is well known for its elaborately tiled architecture. In this post I would like to touch on one of my favorite Islamic periods, the Seljuk period (1071-1229[1]) Their artistic traditions form a solid bedrock for mosaic history that can be traced to numerous styles throughout the world. Additionally I would like to share one of my own methods of mosaic construction.
“The Anatolian style of Seljuk architecture was in full bloom by the 13th century. Seljuk mosques, medreses (theological academies), tombs, and palaces were lavishly decorated with exquisite tiles. Examples of such tile-clad structures can still be seen in the Seljuks' capital city of Konya as well as in the cities of Sivas, Tokat, Beysehir, Kayseri, Erzurum, Malatya, and Alanya.”[2] They would create large single colored glazed slabs and cut geometric pieces out of them after they were fired using chisels. The tiles were laid out into patterns face down and a plaster mortar was poured over the back creating slabs of mosaic that they then installed. [3]
This technique is difficult and tedious, however, (and) the multi-colored technique came to be preferred. Up to the middle of the sixteenth century multi-colored tiles were made in glazes of various colors.[4]
Our preferred method of mosaic construction is to press out individual tiles and assemble them after they have been glazed.

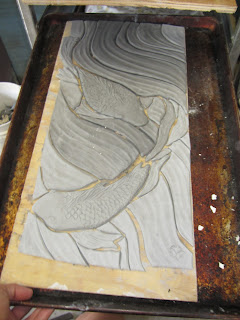
Additionally, Tortuga Tile Works creates mosaics that are part press molded and part slab rolled and cut. This technique allows for individual one of a kind compositions. A large slab is rolled out. Detailed tiles such as koi fish or waterlilies are pressed out and arranged on the slab and then the slab is cut while it is wet to accommodate these pressed tiles. Waves and texture are then sculpted and pieces are sliced.
Before the tiles are fired. A picture is taken, a numbered key is created and then each piece is marked with a corresponding number.
After the tiles are bisqued and glaze fired, the mosaic is put back together like a jigsaw puzzle. They are then transferred to hardy board, laid in thin-set cement, grouted and sealed. For more information on the cement and grouting process, please see the about section on my website.
[2] Turkish Ceramics:History of Turkish Tile from http://www.turkishceramics.info/content/history-turkish-tiles
[3] Herbert, T. & Huggins K. (1995) The decorative tile. (pp. 11) London: Phaidon Press Limited.
[4]Arslanapa , Prof. Dr. OKTAY from Ottoman Souvenir: Tile History http://www.ottomansouvenir.com/General/Tile_history.htm


No comments:
Post a Comment